- We will learn to make Mike from Mosters Inc. Prefferably we need a side profile image but until I find one this will suffice.
-Download Mike's image

-First step is to add the image as a reference just like we did with the robot.
-Set the image reference to be viewed in Front Orthogonal.
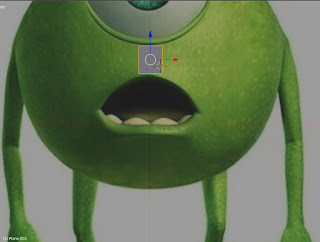
-Now go to the front orthogonal view to see the reference (press 1 in the numpad, if you still dont see the image you must be in perspective mode so press 5)
-Move the reference image until it looks like its centered in the origin lines.
-Now add a plane, rotate the plane and place it in right on top of the mouth
-Select the plane and go to "Edit Mode" and in edit mode choose "Face Mode"
-Once in edit mode on the left panel select tools and click "loop cut and slide"
-Move the mouse to the top middle area of the plane until you see a line and click twice without moving it, this will divide the face in two
-Select the left face and delete it.
-Now while in "Edit Mode" go to the modifiers menu (the little wrench icon)
-And select Mirror, in the mirror preferences check the "clipping" box.
- And the icon to show the modifier in edit mode, looks like this:

-Now we have mirror mode so we can start creating faces. we will start extruding segments so go to segment mode and select the side segments, to extrude use the "e" key, and move/rotate/scale the segments until they look correct.
-Useful shortcuts:
-Download Mike's image

-First step is to add the image as a reference just like we did with the robot.
-Set the image reference to be viewed in Front Orthogonal.
-Now go to the front orthogonal view to see the reference (press 1 in the numpad, if you still dont see the image you must be in perspective mode so press 5)
-Move the reference image until it looks like its centered in the origin lines.
-Now add a plane, rotate the plane and place it in right on top of the mouth

-Select the plane and go to "Edit Mode" and in edit mode choose "Face Mode"
-Once in edit mode on the left panel select tools and click "loop cut and slide"
-Move the mouse to the top middle area of the plane until you see a line and click twice without moving it, this will divide the face in two
-Select the left face and delete it.
-Now while in "Edit Mode" go to the modifiers menu (the little wrench icon)
-And select Mirror, in the mirror preferences check the "clipping" box.
- And the icon to show the modifier in edit mode, looks like this:

-Now we have mirror mode so we can start creating faces. we will start extruding segments so go to segment mode and select the side segments, to extrude use the "e" key, and move/rotate/scale the segments until they look correct.
-Useful shortcuts:

No comments:
Post a Comment